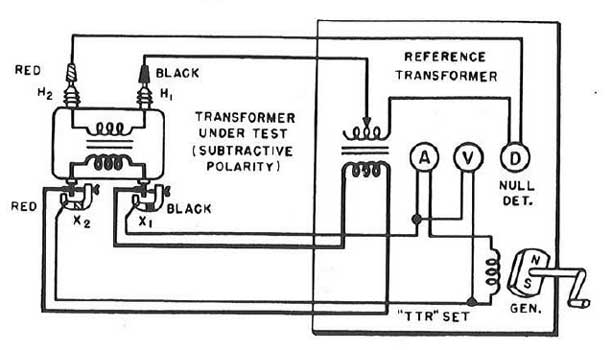
Single Phase TTR Connection Diagram.
There may be instances where mechanical wear or electrical failures can cause a turns ratio test set to be inaccurate or inoperative. You can verify the performance of your hand-crank TTR by quickly running through the following checks:
1. Null Check
Failure to obtain a voltmeter reading by using the Null Check may indicate a faulty generator, a defective voltmeter, a defective ammeter or a wiring defect. The use of a volt-ohmmeter is usually sufficient to isolate or identify these defects by referencing the wiring diagram for your test set.
- Adjust measurement knobs to zero, (0.000).
- Close both X1 and X2 clamps so the screws seat firmly on their respective anvils.
- Separate the X1 and X2 clamps electrically and electrically isolate H1 and H2 clips.
- Observe that all meter pointers are on zero. Crank the generator so that the voltmeter reads 8 volts.
- The ammeter pointer should deflect approximately 3 divisions on the ÷ 5 range and 1/2 division on the X1 range.
If speed in excess of 120 RPM is required to produce 8 volts when performing a null check, an abnormal burden is most likely being placed on the generator, or the generator itself has become demagnetized.
If the generator is hard to crank during the null check, or the ammeter indicates current, there is a short circuit somewhere in the generator output circuit up to and including the X1 and X2 clamps.
2. Zero Ratio Check
- Close both X1 and X2 clamps so the screws seat firmly on their respective anvils.
- Separate the X1 and X2 clamps electrically. Connect the two secondary leads H1 and H2 together and leave the dials at zero (0.000).
- Crank the generator so that 8 volts is indicated on the voltmeter. While cranking, observe the galvanometer. If it does not read zero, adjust the fourth dial so that the meter reads zero while cranking at 8 volts. The fourth dial should then read zero within half a division. Error in the zero check affects the fourth-dial reading by the magnitude of the error.
Note: This check can be made while a transformer under test is connected to the exciting leads.
3. Unity Ratio Check
- Close both X1 and X2 clamps so the screws seat firmly on their respective anvils.
- Separate the X1 and X2 clamps electrically.
- Connect the black secondary lead H1 to the black exciting lead X1.
- Connect the red secondary lead H2 to the red exciting lead X2. Set the dials to read 1.000.
- Crank the generator so that 8 volts is indicated on the voltmeter. While cranking, observe the galvanometer. If it does not read zero, adjust the fourth dial so that the meter reads zero while cranking at 8 volts. The set should read within 1/2 division of zero on the fourth dial.
- Reset the dials to read 0.9 + 100 on the fourth dial (1.000), again adjusting the fourth dial for zero indication (null) of the galvanometer. The set should read unity within half a division of the fourth dial. Error in unity check affects the fourth dial by reading the magnitude of the error.
Note: This check should be made with no connections to the leads except those specified above.
If the null detector reading of the unity test is not within tolerance the synchronous rectifier may be out of balance or defective. Consult your test set manual for procedures required to accurately balance and check the accuracy of the synchronous rectifier.
